Healthcare
  Education
  Automotive
  Real Estate
  Fashion
  Logistic
  Fitness
  Tourism
  Travel
  Banking
  Media
Media  E-commerce
  Themes
 Plugins
 Patterns
A Comprehensive Guide to Developing and Distributing Flutter Plugins on pub.dev
Flutter
Are you a Flutter developer looking to extend your app’s capabilities? Learn how to create a Flutter plugin and share it on pub.dev, the official repository for Flutter and Dart packages. With Flutter’s flexibility, you can seamlessly integrate native code, third-party libraries, or custom features into your apps. In this easy-to-follow guide, we’ll take you through the process of building and publishing your very own Flutter plugin, opening up new possibilities for your projects and contributing to the Flutter community.
What is a Flutter plugin?
In the world of Flutter, a plugin is essentially a package containing platform-specific code (written in Java/Kotlin for Android and Objective-C/Swift for iOS) that communicates with your Flutter Dart code. It acts as a bridge between the Flutter framework and the underlying native code, enabling you to access native device features or leverage third-party libraries.
Why Create a Plugin?
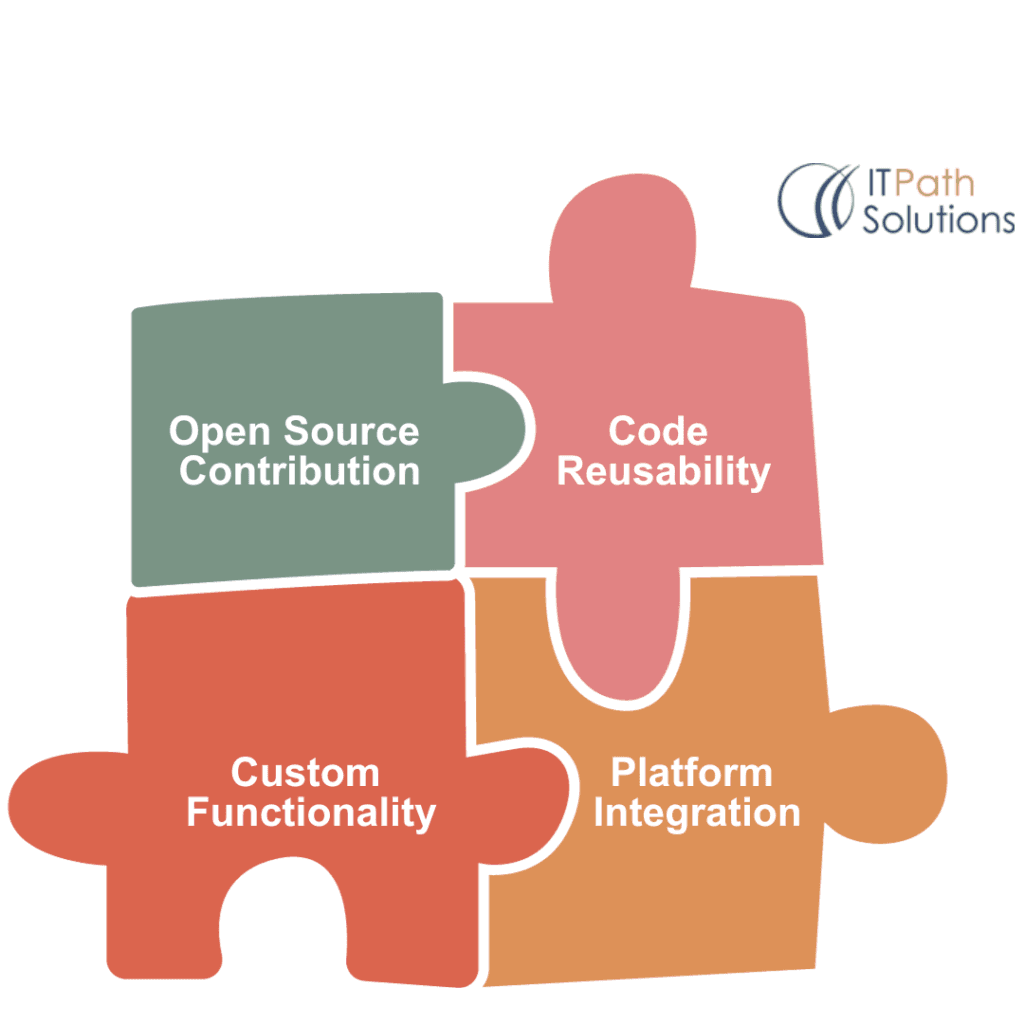
Fig 1. Advantages of flutter plugin
There are several compelling reasons to create your own Flutter plugin:
- Code Reusability: Share your codebase across multiple Flutter projects or with the broader Flutter community.
- Open Source Contribution: Contribute to the Flutter ecosystem by publishing your plugin for others to use.
- Custom Functionality: You can add features or functionality that Flutter doesn’t provide out of the box.
- Platform Integration: Plugins enable you to access native device features like sensors, cameras, and hardware-specific APIs.
Now, before we dive into the step-by-step process of creating a Flutter plugin, keep in mind that this is a somewhat involved process that requires some knowledge of both Flutter and native mobile development. We’ll break it down into manageable steps to make it as accessible as possible.
Steps to Create a Flutter Plugin
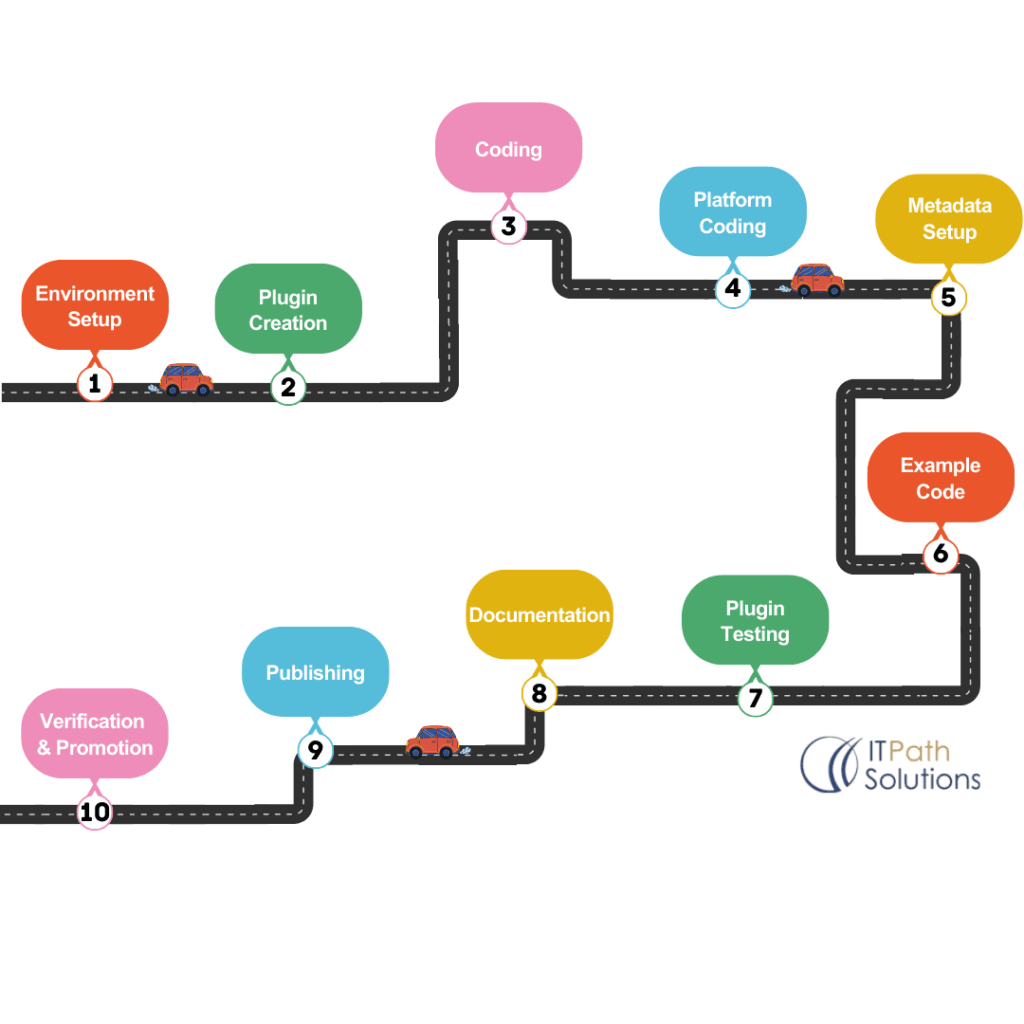
Fig 2. Steps to create a flutter plugin
Creating a Flutter plugin from scratch is a journey that involves a series of tasks, from setting up your development environment to publishing your plugin to the official Flutter packages repository. In the upcoming sections, we’ll guide you through each step in detail.
Here is a concise overview of the steps in the process:
Step 1: Setting Up Your Development Environment
Ensure you have the following Flutter and the necessary platform-specific tools installed before we get started:
- Flutter SDK must be installed on your machine.
- A basic understanding of Dart and Flutter.
- An active account on pub.dev (If you don’t have one, sign up at pub.dev using your email).
Step 2: Create a New Flutter Plugin Project
You can create a Flutter plugin either using Android Studio or from the command line.
- Using Android Studio:
- Open Android Studio.
- You can create a new Flutter project by clicking “File” ⇒ “New” ⇒ “New Flutter Project.”
- Select “Flutter Plugin” as the project type.
- Click “Next” and follow the on-screen instructions to configure your project. You’ll need to provide a package name, a plugin name, and other project-specific details.
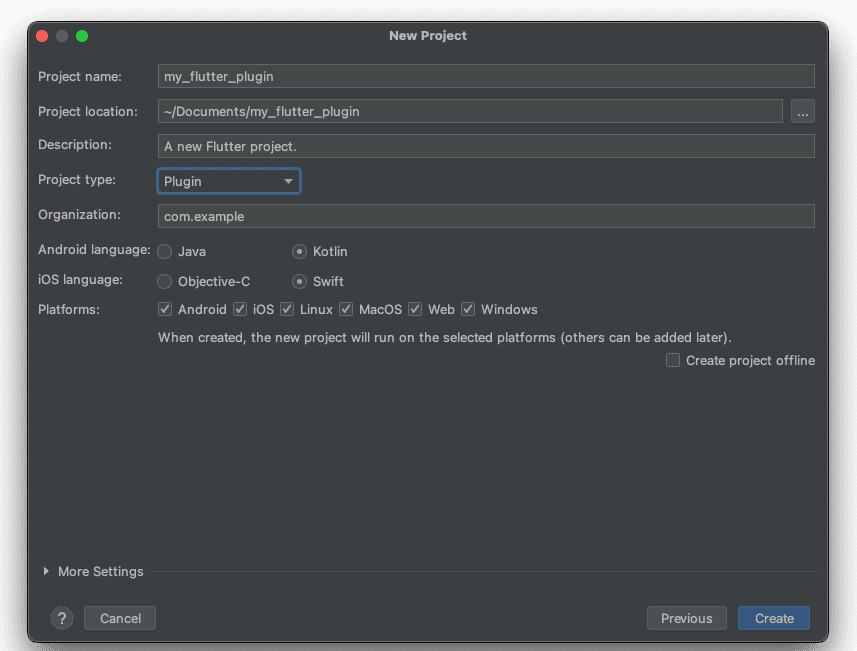
Fig 3. Choose ”Plugin” as the ”Project Type”
- Using the terminal:
To create a Flutter plugin using the terminal, open your terminal and run the following command: flutter create –template=plugin my_flutter_plugin
[Replace my_flutter_plugin with the desired name of your plugin.]

Fig 4. Use the above command to create a Flutter plugin project
After the project is created, its structure will resemble the following:
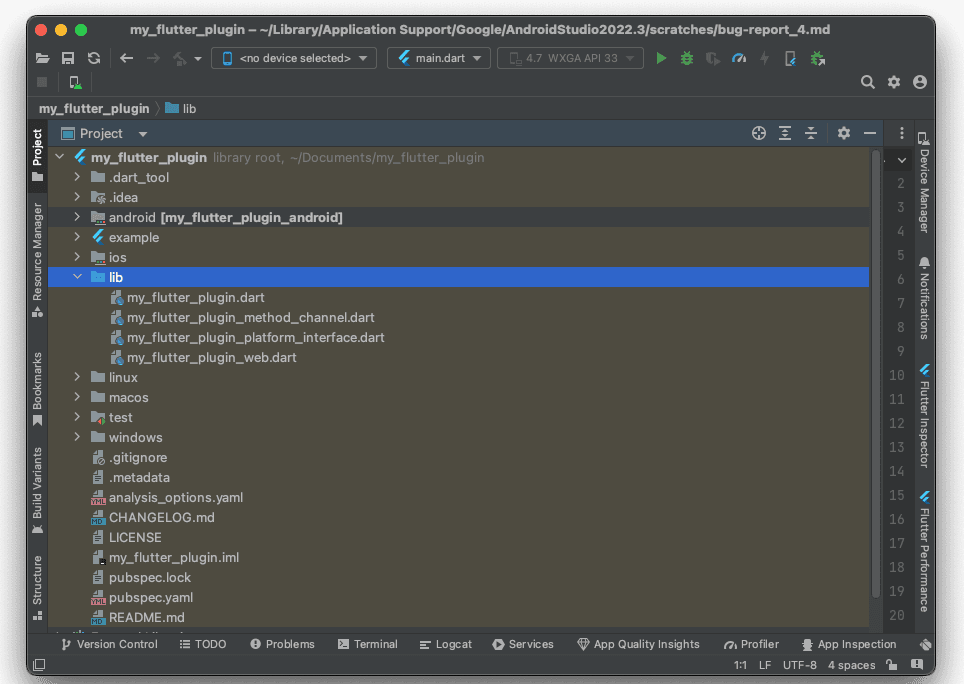
Fig 5. Project structure
Step 3: Implement Platform-Specific Code
Navigate to the lib directory within your newly created plugin project. Inside, locate a file named my_flutter_plugin.dart. Your plugin’s functionality will be defined here. You can include methods, classes, and other essential code for your plugin here.
For example, let’s create a simple plugin that displays a message in the snackbar. Modify my_flutter_plugin.dart as follows:
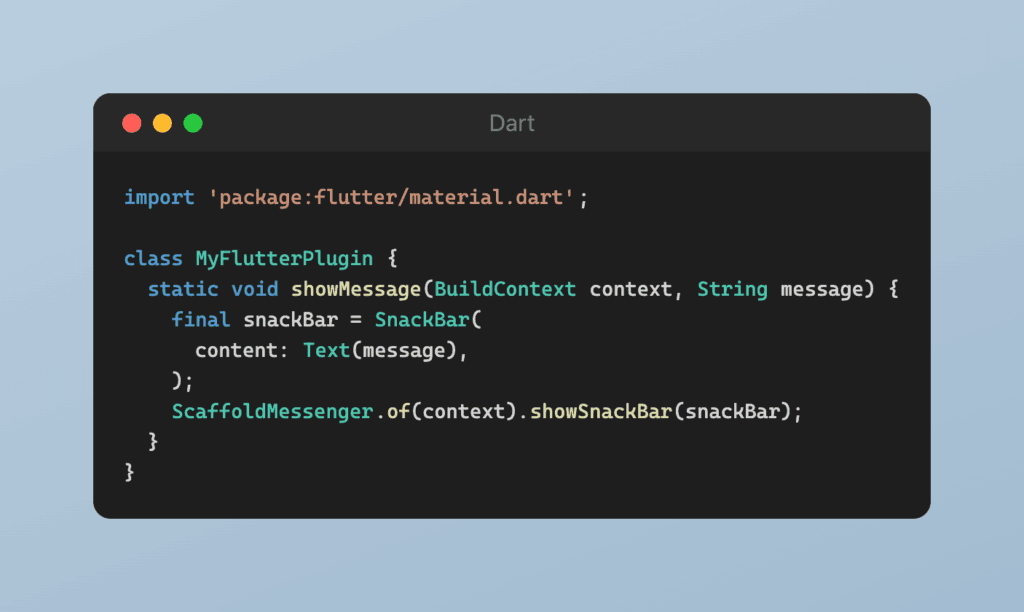
Fig 6. Simple plugin code to print a msg in the snackbar
This code defines a method showMessage that displays a message in the snackbar.
Step 4: Define Platform-specific Implementations
To make your plugin compatible with both Android and iOS, you’ll need to develop platform-specific code. Create platform-specific implementation files as follows:
- For Android, navigate to android/src/main and generate a Kotlin or Java file for your plugin. Implement the necessary functionality in this file.
- For iOS, head to iOS/Classes and establish a Swift or Objective-C file. Implement the iOS-specific functionality in this file.
Step 5: Configuring Plugin Metadata
In the root directory of your plugin project, locate the ‘pubspec.yaml‘ file. This file contains essential metadata about your plugin. Ensure that you complete all required fields, including name, description, version, and author.
Here’s an example.
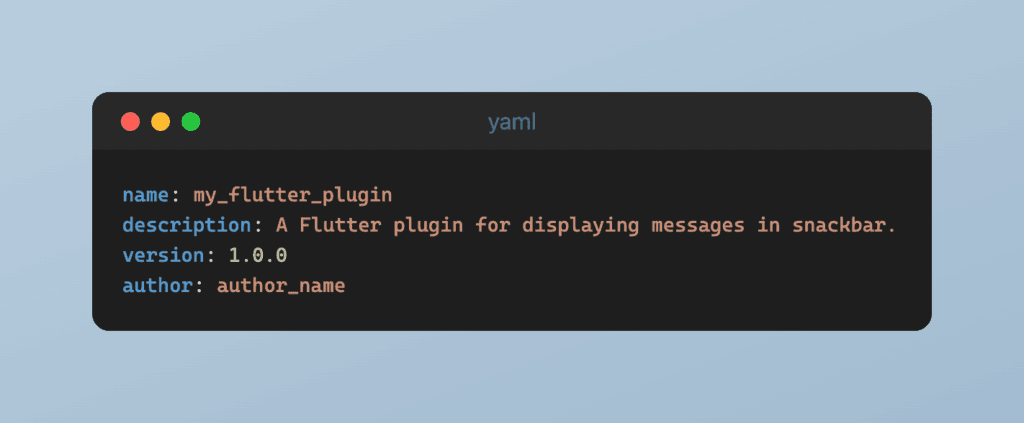
Fig 7. Change the above details in the ”pubspec.yaml” file
Step 6: Create an example Code
Include example code to demonstrate how your plugin is utilized. You can add example usage to the “example” directory of your plugin project.
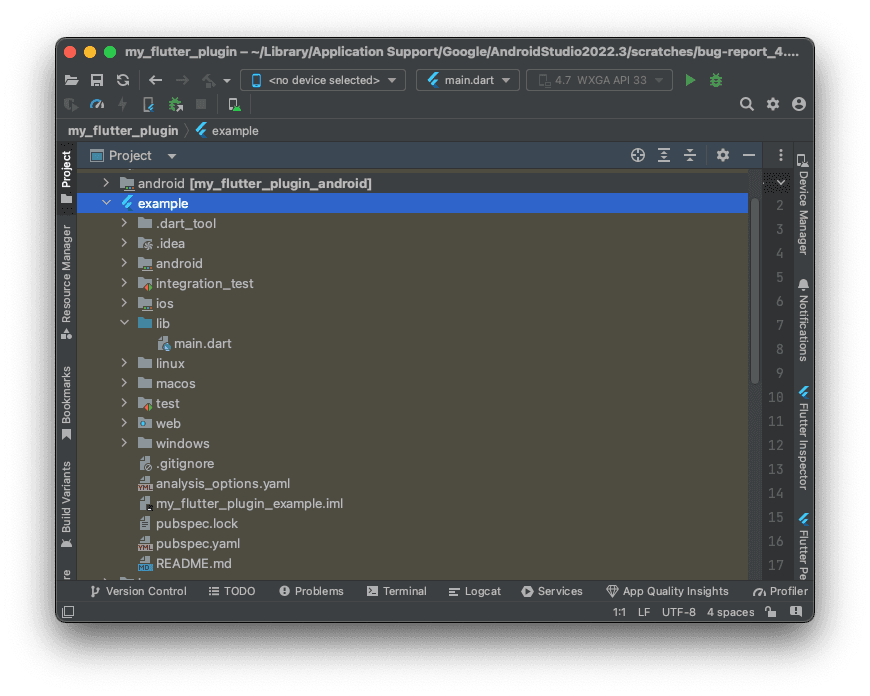
Fig 8. Structure of an example directory
Step 7: Test Your Plugin
Before publishing, it’s crucial to test your plugin to ensure it works as expected. Create a sample Flutter app that imports and uses your plugin. Test all the plugin’s functionalities to verify they function correctly on both Android and iOS.
Add an example to “main.dart” inside the lib directory.
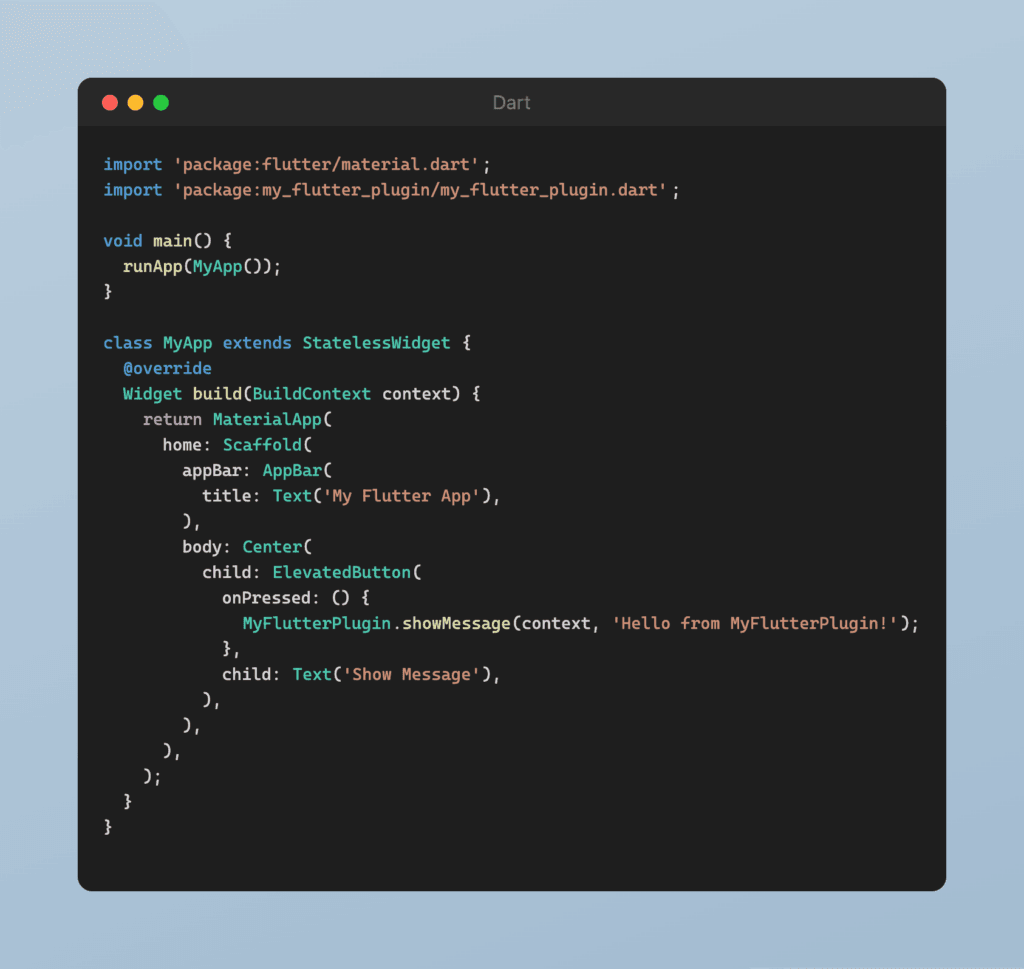
Fig 9. Display a message using the plugin
Step 8: Document your plugin
Creating clear and concise documentation is essential for making your Flutter plugin accessible to other developers. Here are the key steps:
- Write a README: Create a comprehensive README.md file that explains what your plugin does, how to install it, and provides usage examples.
- Inline Comments: Use comments in your code to explain complex logic and provide context for other developers.
- Generate API Reference: Consider using tools like Dartdoc to automatically generate API reference documentation from your code comments.
- Update Regularly: Keep your documentation up-to-date as you make changes to your plugin.
- Seek Feedback: Get input from other developers to improve clarity and completeness.
- Publish Documentation: Host your documentation on a platform like GitHub Pages and link to it from your README.
Well-documented plugins are more likely to be adopted by the Flutter community and contribute to your recognition as a developer in the ecosystem. You can learn more about documentation from Effective Dart: Documentation on dart.dev.
Step 9: Publishing Your Plugin
Once you’ve thoroughly tested your plugin, it’s time to publish it on pub.dev.
Follow these steps:
- Ensure your plugin’s code is hosted in a public Git repository (e.g., GitHub).
- Commit and push your code changes to the repository.
Navigate to the root directory of your plugin project in the terminal and run the following command: flutter pub publish –dry-run
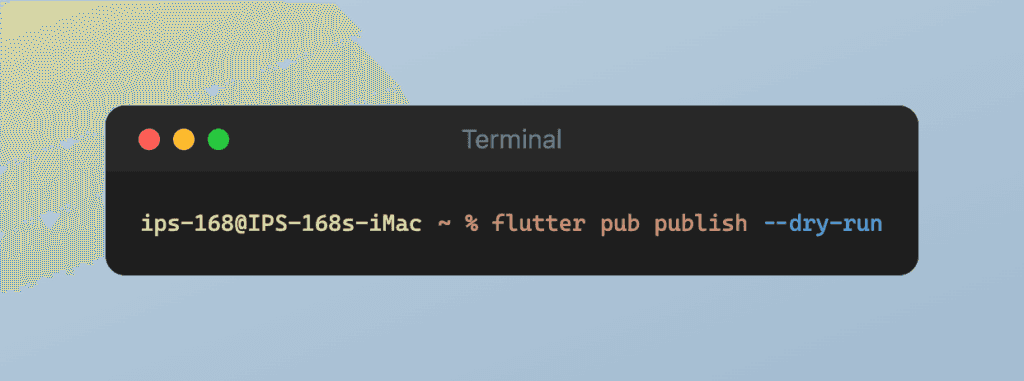
Fig 10. Perform a dry run to check for any potential issues
- If the dry run is successful, publish your plugin with the following command: flutter pub publish

Fig 11. Publish the plugin to pub.dev
This command will upload your plugin to pub.dev.
Step 10: Verification and Promotion
After publishing, visit your plugin’s page on pub.dev to verify that it’s listed correctly. Ensure that the documentation and examples are accurate.
Promote your plugin within the Flutter community by sharing it on forums, social media, and other developer channels.
Congratulations! You’ve successfully created a Flutter plugin and published it on pub.dev, making it available to the Flutter community. Your contribution will help other developers enhance their Flutter apps with your custom functionality.
Navigating the Challenges of Flutter Plugin Creation
Creating my own Flutter plugin, ‘pretty_button’, was a significant milestone in my professional journey as I delved into the world of developing and publishing plugins on pub.dev. This project aimed to provide Flutter developers with a versatile and visually appealing button widget. Throughout this endeavor, I faced numerous challenges that turned out to be valuable learning experiences. I invested a considerable amount of time and effort to meticulously refine the plugin, ensuring it consistently met the highest standards of quality and usability.
One of the most rewarding aspects of this journey has been the overwhelmingly positive response and support from the Flutter community. ‘pretty_button‘ has earned exceptional ratings and received glowing reviews on pub.dev, which speaks to the unwavering dedication and careful craftsmanship invested in its development. However, it’s worth noting that achieving a perfect score of 140 out of 140 pub points, especially in the documentation and other metrics, presented its own set of challenges.
I faced numerous challenges on the path to achieving these commendable ratings. It is precisely these challenges that prompted me to write this blog post. My goal is to provide a comprehensive guide that enables you to navigate the complexities of plugin development with ease, allowing you to avoid the roadblocks and pitfalls I encountered.
By following the steps outlined in this blog, you can streamline your own plugin development process and achieve outstanding results without the obstacles I faced. My hope is that you won’t have to wrestle with the same difficulties I did, and this blog serves as a valuable resource to ensure your plugin creation journey is as smooth and successful as possible.
If you have yet to explore the ‘pretty_button‘ plugin on pub.dev, I extend a warm invitation to do so. I sincerely hope that it enriches your Flutter development journey as profoundly as it has enriched mine. I would like to express my gratitude for your participation in this exciting journey, and I eagerly anticipate the prospect of engaging in more exhilarating projects and collaborations in the future.