Healthcare
  Education
  Automotive
  Real Estate
  Fashion
  Logistic
  Fitness
  Tourism
  Travel
  Banking
  Media
Media  E-commerce
  Themes
 Plugins
 Patterns
Connecting Contact Form 7 To Zapier – Easy Steps For Integration
contactform
Introduction
Contact Form 7 is a popular WordPress plugin that allows website owners to create and manage multiple contact forms effortlessly. It offers a simple and flexible interface for designing and customizing forms to suit specific needs. Contact Form 7 is widely used for various purposes, such as collecting customer inquiries, gathering feedback, or enabling users to sign up for newsletters.
On the other hand, Zapier is a powerful automation tool that connects different web applications and services, enabling seamless data transfer and workflow automation. With Zapier, you can automate tasks by creating “Zaps” – workflows that connect triggers and actions between different apps. Zapier supports a wide range of popular apps and services, making it a versatile solution for automating processes and saving time.
Expanding the functionality of Contact Form 7
Integrating Contact Form 7 with Zapier expands the capabilities of the plugin beyond its core features. Contact Form 7 provides a solid foundation for form creation and management, but by connecting it to Zapier, you can extend its functionality and leverage the vast ecosystem of apps and services supported by Zapier.
For example, you can integrate Contact Form 7 with popular email marketing tools like Mailchimp or ConvertKit to automatically add form submissions to your email lists. You can connect it to project management platforms like Asana or Trello to create tasks or assign follow-up actions. You can even integrate it with CRM systems like Salesforce or HubSpot to automatically create leads or contacts from form submissions.
By connecting Contact Form 7 to Zapier, you can unlock endless possibilities for automation and seamlessly integrate it into your existing tech stack. This integration empowers you to optimize your workflows, streamline data management, and extract more value from your Contact Form 7 forms.
Connecting Contact Form 7 to Zapier
Connecting Contact Form 7 to Zapier is a straightforward process that involves a few simple steps. Follow this step-by-step guide to establish the connection:
- Sign in to your Zapier account: If you don’t have one already, create a Zapier account at zapier.com and sign in.
- Navigate to the Zapier Dashboard: Once logged in, you will be directed to the Zapier Dashboard. This is where you can create and manage your Zaps.
- Create a new Zap: Click on the “Make a Zap” button to start creating a new Zap.
- Set up the Trigger: In the Zap editor, search for “Contact Form 7” in the app directory and select it as the trigger app.
- Authenticate Contact Form 7: Follow the instructions to connect your Contact Form 7 account to Zapier. This typically involves providing the URL of your website where Contact Form 7 is installed.
- Configure the Trigger: Specify the trigger event in Contact Form 7 that will initiate the Zap. For example, you might choose the “New Form Submission” event.
- Test the Trigger: Zapier will prompt you to test the trigger by fetching a sample form submission. Ensure that the test is successful before proceeding.
- Set up the Action: Choose the action app you want to connect to Contact Form 7 in Zapier. This could be an email marketing tool, CRM system, or any other app that supports Zapier integration.
- Authenticate the Action App: Follow the authentication process for the chosen action app and provide any required credentials or API keys.
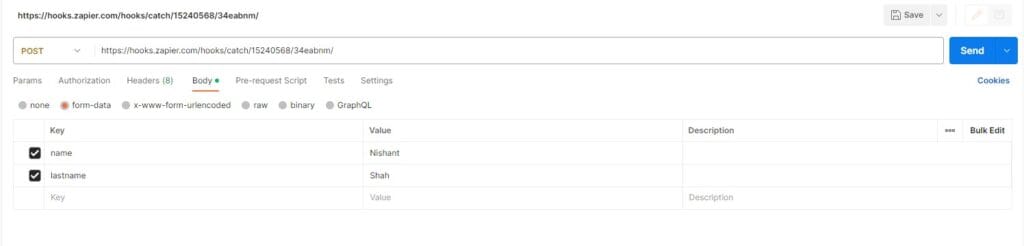
- Map the fields: Configure how the data from Contact Form 7 should be mapped to the corresponding fields in the action app. This ensures that the form submission data is correctly transferred and stored in the destination app.
- Test and activate the Zap: Zapier will allow you to test the Zap by sending a sample form submission and verifying that the data is successfully transferred to the action app. Once you’re satisfied with the test results, activate the Zap to make it live.
Installing and activating the Contact Form 7 Zapier plugin
To facilitate the connection between Contact Form 7 and Zapier, you’ll need to install and activate the Contact Form 7 Zapier plugin. Follow these steps to get started:
- Log in to your WordPress admin panel.
- Navigate to the “Plugins” section and click on “Add New.”
- In the search bar, enter “Contact Form 7 Zapier.”
- Locate the Contact Form 7 Zapier plugin from the search results and click on the “Install Now” button.
- After the installation is complete, click on the “Activate” button to activate the plugin.
- Obtaining the necessary API keys and credentials
To establish the connection between Contact Form 7 and Zapier, you will need to obtain API keys or credentials from both platforms. Here’s an overview of the steps involved:
- Contact Form 7: The Contact Form 7 Zapier plugin typically requires the Zapier API key. To obtain this, you’ll need to create a Zapier API key within your Zapier account. Refer to the Zapier documentation for detailed instructions on generating the API key.
- Zapier: When setting up the Zap within Zapier, you will be prompted to connect your Contact Form 7 account. This usually involves providing the URL of your website where Contact Form 7 is installed.
- WordPress: Ensure that you have the necessary administrative access to your WordPress website, as you will need it to install and activate the Contact Form 7
Recommendations for Optimizing Contact Form 7 and Zapier integration
To make the most out of your Contact Form 7 and Zapier integration, consider the following recommendations:
- Keep forms simple and focused: Design your Contact Form 7 forms with a clear purpose in mind. Keep them concise and collect only the necessary information to avoid overwhelming users and minimize data transfer complexity.
- Use conditional logic: Leverage Contact Form 7’s conditional logic feature to create dynamic forms. This allows you to show or hide specific fields based on user selections, providing a more personalized experience and reducing unnecessary data transfers.
- Test your Zaps thoroughly: Before deploying your integration in a live environment, thoroughly test your Zaps to ensure the data flows correctly and triggers the desired actions. Conduct comprehensive testing across various scenarios and form submissions to identify and address any potential issues.
- Implement error handling mechanisms: Configure error handling in Zapier to handle any failed actions or data transfer issues. Set up notifications or alerts to promptly identify and rectify any problems that arise during the integration process.
- Monitor Zap performance: Regularly monitor your Zaps’ performance to ensure they continue to function smoothly. Keep an eye out for any changes in API endpoints, updates in apps or services, or potential changes in form structure that may impact the integration.
Handling Errors, Testing & Troubleshooting Common Issues
When integrating Contact Form 7 with Zapier, it’s important to be aware of common issues and have troubleshooting strategies in place:
- Verify API keys and credentials: Double-check that the API keys and credentials entered in both Contact Form 7 and Zapier are accurate and properly configured. Any mismatch or incorrect information can disrupt the integration.
- Check compatibility with other plugins: Ensure that Contact Form 7 and other plugins installed on your WordPress website are compatible and do not interfere with the form submissions or data transfer process. Keep plugins updated to minimize conflicts.
- Monitor form submission data format: Pay attention to the format of the data submitted through Contact Form 7. Some apps or services connected via Zapier may have specific data format requirements. Adjust and format the data appropriately to ensure seamless integration.
- Utilize Zapier’s logging and monitoring tools: Take advantage of Zapier’s logging and monitoring features to track the flow of data, identify any errors or bottlenecks, and troubleshoot issues effectively. Use these tools to gain insights into the integration process and make necessary adjustments.
- Reach out to support channels: If you encounter persistent issues or need technical assistance, reach out to the support channels of Contact Form 7, Zapier, or any other relevant apps involved in the integration. They can provide specific guidance and help resolve any complex issues you may encounter.
Conclusion
Integrating Contact Form 7 with Zapier opens up a world of possibilities for automating your form submissions and streamlining your workflows. By following best practices, testing thoroughly, and troubleshooting common issues, you can ensure a seamless integration experience. Embrace the power of automation to save time, enhance data management, and improve the efficiency of your Contact Form 7 forms. With the right strategies in place, you’ll unlock new levels of productivity and deliver a smoother user experience for your website visitors.